
Root A Galaxy Note 4 SM-N910V And Install TWRP Recovery On It
In this guide, we’re going to show you how you can root a Galaxy Note 4 and install TWRP recovery on it using Odin. We will flash the recovery and at the same time we will be flashing Super SU and this will root your device.
Припремите свој телефон:
- This guide is only for use with the Samsung Verizon Galaxy Note 4. Using it with another device could brick it. Check your device model number by going to Settings>More/General>About Device or else try Settings>About Device.
- Пуните батерију на најмање КСНУМКС проценте. Ово је да бисте били сигурни да уређај неће изгубити напајање пре него што се процес заврши.
- Имајте ОЕМ дата кабл који можете користити за успостављање везе између вашег телефона и рачунара.
- Направите резервне копије дневника, контаката и важних СМС порука
- Правите резервне копије важних медијских датотека копирањем на рачунар или лаптоп.
- Have a Back up EFS made.
- If your device is rooted, use Titanium Backup to backup apps, system data and any other important content.
- If you had CWM or TWRP previously installed, create a Backup Nandroid.
Напомена: Методи потребни за бљесак прилагођених опоравака, датотека и роот-а на ваш телефон могу довести до бријања вашег уређаја. Корење уређаја такође ће поништити гаранцију и неће више бити подобно за бесплатне услуге уређаја од произвођача или даваоца гаранције. Будите одговорни и држите их на уму пре него што одлучите да наставите на своју одговорност. У случају да дође до несреће, ми или произвођачи уређаја никад не сматрамо одговорним.
Довнлоад:
- ОдинКСНУМКС вКСНУМКС.
- Самсунг УСБ драјвери
Install TWRP Recovery On Verizon Note 4
- Отвори Один
- Put your phone into download mode by first turning if off and waiting for 10 seconds. Then, turn your phone back on by pressing and holding the volume down, home, and power buttons at the same time. When you see a warning, press volume up,
- Connect your phone to a PC. Make sure that you’ve already installed the Samsung USB drivers.
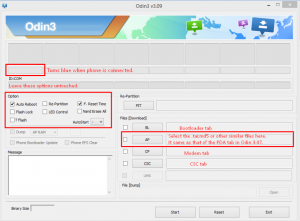
- When your phone is detected by Odin, you should see the ID:COM box turn blue.
- If you have an Odin 3.09, choose the AP tab. If you have an Oding 3.07, choose the PDA tab.
- From either the AP or PDA tab, choose the .tar.md5 or .tar file that you downloaded, leave the rest of the options untouched.
- Ensure that the options selected in your Odin match the photo below.
- Hit start and flashing will begin. Wait for it to complete.
- When complete, you device should restart, remove it then from the PC.
Root Your Device:
- Connect device with PC.
- Copy and past the downloaded zip files to your sdcard’s root.
- Одспојите кабл.
- Искључите уређај
- Open the device into recovery mode by pressing and holding down the volume up, home and power buttons till text appears on screen.
ТВРП корисници.
- Славина Бацк-Упи Изаберите Систем и подаци
- ПревуцитеКлизач потврде
- Славина Тастер за брисањеа затим изаберите
- Украсти Клизач за потврду.
- Ретурн то Главни мении Тап Инсталл Буттон.
- Лоцирати УПДАТЕ-СуперСУ-вКСНУМКС.зип Превуците клизач To install .
- When Installation is Over, you will see the prompt: Сада ресетуј рачунар
- одабрати РебоотСада and your device should reboot.
- КоришћењеРоот Цхецкер апп or go to your App drawer and check that Super SU app is there to confirm that you have rooted your device.
Have you installed a TWRP Recovery and rooted your device?
Подијелите своје искуство у доњем тексту.
JR
[embedyt] https://www.youtube.com/watch?v=k2oOvf5tOCY[/embedyt]


Tengo una note la n910v y he intentado hacer root de todas las formas por odio por add en odin me da fail je intentando con varios de esta variente pero no he podido
Siga cuidadosamente las instrucciones paso a paso en la guía detallada anteriormente.
Deberia de funcionar.